Add and manage graphics
This (Help Scout) site is in the process of being replaced by a new knowledge base. Please refer to the relevant page on that site and update links/bookmarks you have saved.
In this article
3 Add a figure containing sub figures
There are four types of graphic that can be inserted in your document:
| Graphic type | Purpose/ Description |
| Figure | A figure that will be listed in the "Table of figures" and has an automatic label (e.g. Figure 1) and a title. Figures can have a note and/or a key associated. Figures can contain multiple graphics and can be wrapped in a figure group. |
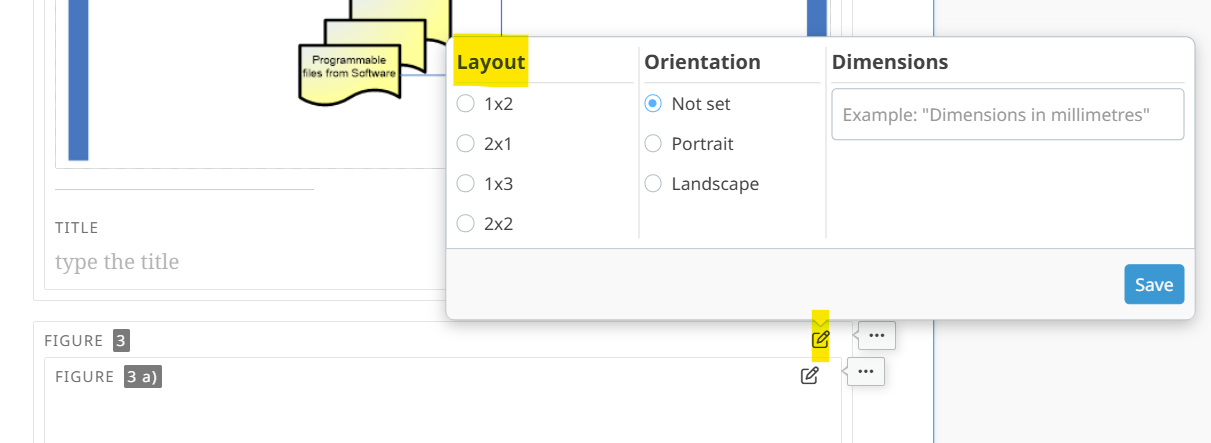
| Figure containing sub-figures | As for Figure, all subfigures will be automatically labelled (e.g. Figure 1a) , Figure 1b)), all will be listed in the "Table of figures". |
| Image | A simple graphic in your text, without a title or a label. |
| Inline image | A simple graphic inline with your text, without a title or a label. |
1 Add a figure
- Figures are automatically numbered inside the document as you add them, starting with Figure 1 and incrementing with each new Figure.
- To add a figure, place your cursor at the location where the figure should be added and select Graphics from the INSERT menu and choose Figure.
- A pop-up modal will show you all graphics already uploaded to your document, and you can choose any of these for your Figure. You can also upload a new graphic from your device by choosing the Upload option. Select the graphic you want to add and click Insert.
- Please note that only images with the format .png can be uploaded and there is a maximum file size of 10 MB.

- A Figure element will appear. You can type the title of the Figure and add a key or an additional graphic to the figure.

- You can add or insert other elements to a figure from the context menu, such as a note, a graphic, a key, etc. Example below shows a figure with NOTE added.

- Set the size and orientation of the figure to be displayed in the final exported version of the draft using the edit contextual menu.

- The size of a figure or image set in the OSD platform cannot be viewed in the online draft version. It is applied to figure or image only when the final draft is exported.
- For a figure containing multiple images, the selected size setting is applied at the level of the figure and not the individual graphic level (i.e. it applies to all the images in the figure).
- To change the image of your figure, right-click on the graphic and select Change graphic. This menu includes other options including to Remove graphic.

2 Elements of a figure
A figure can contain different elements, to insert elements, click on the contextual menu and select the element needed

Elements will always appear in this order:
- Graphical element (mandatory)
- Array (optional)
- Key (optional/conditional)
- Paragraphs (optional)
- Notes/examples (optional)
- Figure footnotes (optional/conditional)
- Figure title (mandatory)
Only 1 legend element permitted for figures.
3 Add a figure containing sub-figures
- To insert a figure containing sub-figures:
- go to the INSERT menu
- click on the Graphics dropdown menu
- select Figure containing sub-figures
- select a sub-figure to add in this figure and click on the Insert button
- select the LAYOUT edit icon to select an appropriate layout: 1X2, 2X1, 1X3 or 2X2:
- From the context menu of the figure, select Add sub figure, select a sub-figure, and click on the Insert button. Repeat this last step to add more sub figures.
4 Add an image
- To add an image in the text that is not a formal figure (i.e. it does not have a number or a title), select Graphics from the INSERT menu and choose Image:

- A pop-up modal will show you all graphics already uploaded to your document, and you can choose any of these as your Image.
- You can also upload a new graphic from your computer by choosing the Upload option. Select the graphic you want to add and click Insert.
5 Add an inline image
- To add a small image that is inline with the text select Graphics from the INSERT menu and choose Inline Image:

- A pop-up modal will show you all graphics already uploaded to your document, and you can choose any of these as your image.
- You can also upload a new image from your computer by choosing the Upload option. Select the graphic you want to add and select Insert.
- The image will appear as a small icon inside your text.